A dent in your expansion chamber: how much power does it cost, and does where it is matter?
Tutorial 12 · about 15 minutes plus five sweeps
Enduro and MX pipes get hit. The usual advice is that a dent near the cylinder is the one that hurts and a dent in the fat part doesn't matter, and there's a published dyno test that points that way, on one bike with one pipe. This guide puts a dent into a simulated pipe and sweeps it, then moves the same dent down the pipe and makes it shallower, so you can see what it does to the whole power curve and rerun every step yourself.
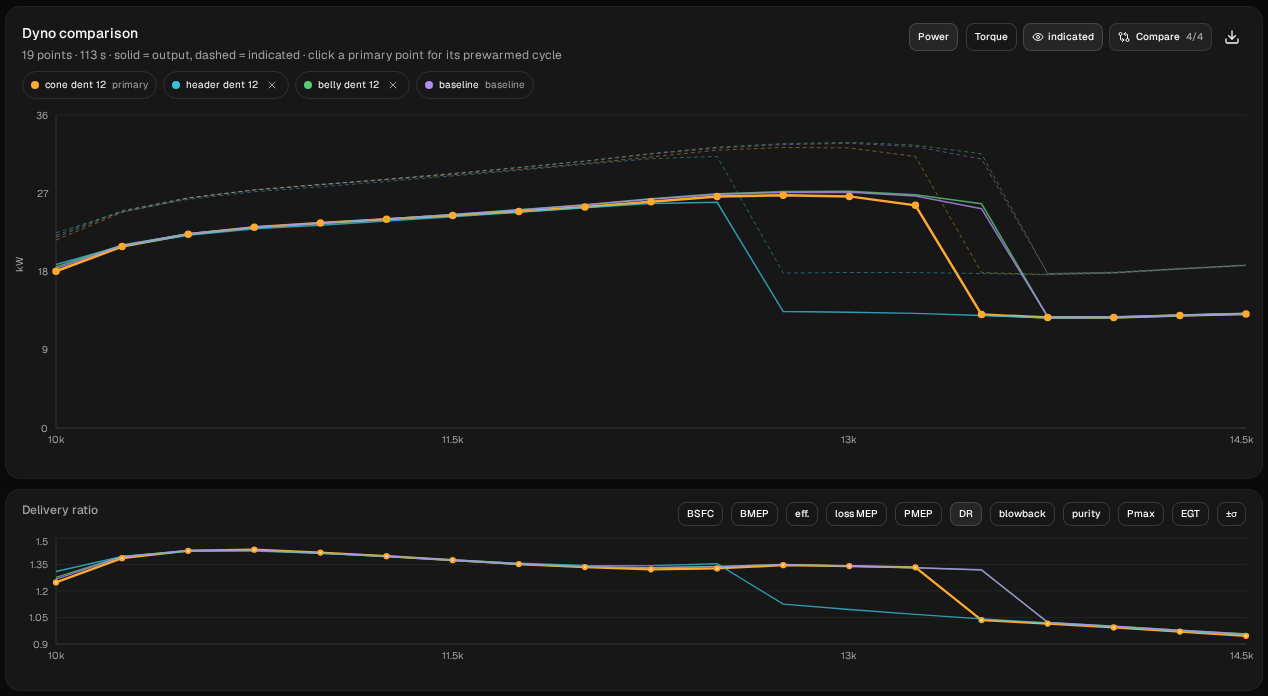
The short answer, in this model: a dent 12 mm deep in the header, 6 in from the flange, cost little below the peak but made the engine fall off the pipe sooner: between 12,500 and 12,750 rpm, where the baseline holds on to 13,500. The peak came down by 1.2 kW (1.6 hp). Half as deep, it cost almost nothing until the top and moved the drop one 250 rpm step. The same 12 mm dent in the first cone, just past the header, moved the drop one step; in the belly it cost nothing anywhere.
What the page can't answer:
- Whether to fix your pipe. The example is the app's 125 moto-X archetype, the engine of tutorials 1, 4, 9, 10 and 11. It isn't a YZ125, a KTM 125 or anyone's actual bike, and the model isn't calibrated against a dyno. What it shows is how to find out on a model of your own engine and pipe.
- The shape of the dent. The model is one-dimensional: at each point along the pipe it knows the cross-section's area and nothing else. A flattened tube and a round one with the same area are the same pipe to it.
- The full cost. In a real pipe, the gas that squeezes past a dent breaks away from the wall behind it and loses energy in the eddies. The model has no loss for that. So the power a dent costs here is only the part that comes from the waves and from the narrower passage: read it as a floor, not the whole cost.
Everything here runs on WaveDyno's free plan with daily run limits. Each sweep has 19 points; the Run dyno button showed 16.6 units for each one at Standard quality, and 19.8 for header dent 12, the one sweep this page runs at High (step 2). That one takes longer too, about 7 to 8 minutes. A finished sweep is charged what it actually used, up to its estimate. Depending on what you've already run today and what each sweep is charged, you may not get through them all in one UTC day. The app refuses a run whose estimate doesn't fit in what's left of the day, and the limit resets at midnight UTC. Your runs stay in the project, so you can pick up where you stopped.
The engine
Create a new project with the setup wizard (the + button at the top, as in tutorial 1), pick 125 moto-X / enduro, keep every answer at its default and create it. On Run → Setup, set the sweep to 10,000 to 14,500 rpm in 250 rpm steps, quality Standard: the sweep of tutorial 4.
On Build → Ducts, the cone table reads, in mm (length / ⌀in / ⌀out): header 265.0 / 40.0 / 45.0, diffuser 210.0 / 45.0 / 100.0, belly 100.0 / 100.0 / 100.0, baffle 218.0 / 100.0 / 23.5, stinger 50.0 / throat / 26.0. The badges read 843 mm total and tuned ≈ 12900 rpm.
Run it and name it baseline:
- Highest sampled point 27.129 kW (36.4 hp) at 13,000 rpm. The top is flat: 12,750 is 0.043 kW lower.
- On the pipe to 13,500, still 25.219 kW there.
- Off the pipe by 13,750: 12.795 kW, about half. A 250 rpm sweep places the drop between 13,500 and 13,750, no closer.
1. What a dent is, to the model
Take the header. It's a cone, 40 mm at the flange and 45 mm where it meets the diffuser 265 mm later, so 155 mm (6.1 in) from the flange it's 42.9 mm across. A rock flattens one side of it: the dent on this page is 12 mm deep, measured from where the wall was.
The model only sees the area, so turn the dent into one. A flat 12 mm deep across a 42.9 mm tube cuts off 22.9 % of its area. A round tube with the area that's left is 37.7 mm across. That's the number the model gets: at its deepest, the dent is a round neck of 37.7 mm.
A real dent has sloped sides. Here it narrows over 15 mm and opens out again over 15 mm, so it's 30 mm long in all, centred 155 mm from the flange.
| Dent | Where (centre, from the flange) | Tube there | Depth | Area lost | Round equivalent |
|---|---|---|---|---|---|
| Header, deep | 155 mm (6.1 in) | 42.9 mm | 12 mm | 22.9 % | 37.7 mm |
| Header, shallow | 155 mm (6.1 in) | 42.9 mm | 6 mm | 8.5 % | 41.1 mm |
| First cone | 295 mm (11.6 in) | 52.9 mm | 12 mm | 17.1 % | 48.1 mm |
| Belly | 525 mm (20.7 in) | 100 mm | 12 mm | 6.8 % | 96.5 mm |
The same 12 mm takes a smaller share of a wider tube: nearly a quarter of the header's area, under 7 % of the belly's.
2. Put a dent in the header
On Build → Ducts, every row of the cone table except the stinger has a + at its right-hand end (hover it: Insert a cone after this section). It adds a new row straight after that one: a 150 mm straight tube at that row's ⌀out. That's how you cut a cone into pieces without changing its shape.
Click the header row's + three times. The table now has eight rows: header, cone 1 to cone 6, and stinger. With anything other than five rows the app stops calling them diffuser, belly and baffle and numbers them instead: cone 4 is the old diffuser. The three new rows are 150.0 mm at 45.0 / 45.0, so for now the pipe is 450 mm longer: the badges read 1293 mm total and tuned ≈ 7800 rpm.
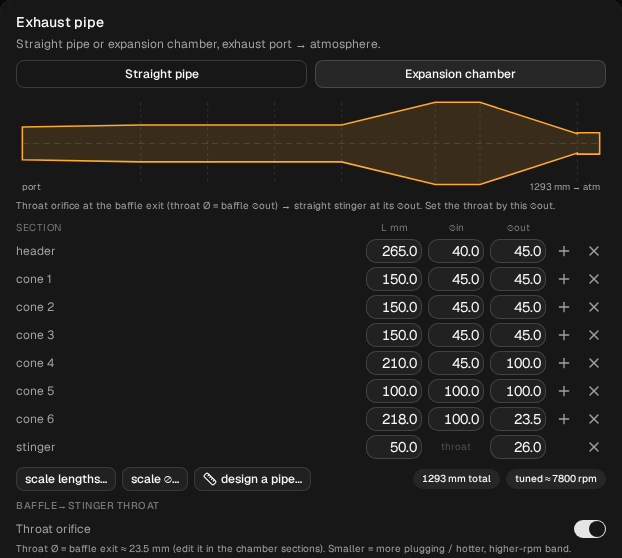
Now type the lengths, top to bottom: header 140, cone 1 15, cone 2 15, cone 3 95. Then the ⌀out values, top to bottom: header 42.6, cone 1 37.7, cone 2 43.2, cone 3 45.0. Press Enter or Tab after each. You never type a ⌀in: each one follows the ⌀out of the row above.
The header is now four pieces: the first 140 mm of the original cone (40 to 42.6 mm), the dent going in (42.6 to 37.7), the dent coming out (37.7 to 43.2), and the last 95 mm of the original cone (43.2 to 45). 42.6 and 43.2 are the original cone's diameters 140 and 170 mm from the flange, to 0.1 mm.
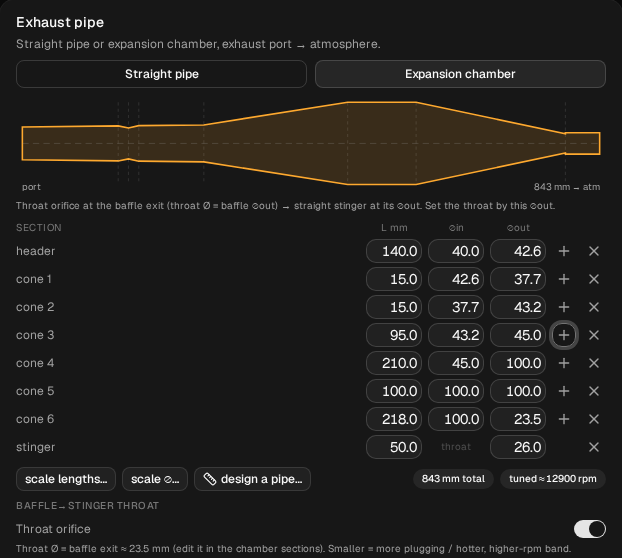
Check it:
- 843 mm total and tuned ≈ 12900 rpm, as before. The pipe is no longer or shorter, and the badge doesn't see the dent at all: it works from the lengths and the port timing. Tutorial 9 shows what the badge can and can't tell you.
- The header still starts at 40.0 mm, so the port still feeds the same opening.
- Compare → Diff inputs against
baselinelists 23 lines, every one under Exhaust / Sections. Diff compares the table row by row, so splitting the header changes every row after it on paper. What matters is that nothing outside Sections changed. (Tutorial 2 shows where Diff inputs is.)
Before you run it, set Run → Setup → Quality to High, for this run only. With this dent the engine falls off the pipe partway up the sweep, and the point where it does is slow to settle. High allows more cycles per point and settles to a tighter tolerance; it doesn't change the pipe or the grid. Standard now also gives a point like that extra cycles, and it settles there too, but the figures on this page come from High, so use it to reproduce them exactly. Diff inputs now lists 29 lines: the 23 under Sections, Quality, and five under Sweep /, the cycle counts and tolerance that High sets. The Run dyno button shows 19.8 units instead of 16.6. We also ran this dent at Standard: High moved its power by less than 0.05 kW at every point, 0.03 kW at 12,750 where it drops off, so it still compares with the other runs, which stay at Standard.
Run the sweep and name it header dent 12. In Compare, set baseline as the baseline.
3. What the dent costs
| rpm | baseline kW | header dent 12 kW | change kW |
|---|---|---|---|
| 10,000 | 18.331 | 18.812 | +0.481 |
| 10,250 | 20.989 | 20.923 | −0.066 |
| 10,500 | 22.329 | 22.175 | −0.154 |
| 10,750 | 23.088 | 22.904 | −0.184 |
| 11,000 | 23.565 | 23.333 | −0.232 |
| 11,250 | 24.045 | 23.816 | −0.229 |
| 11,500 | 24.550 | 24.307 | −0.243 |
| 11,750 | 25.083 | 24.807 | −0.276 |
| 12,000 | 25.658 | 25.341 | −0.317 |
| 12,250 | 26.314 | 25.826 | −0.488 |
| 12,500 | 26.845 | 25.954 | −0.891 |
| 12,750 | 27.086 | 13.386 | −13.700 |
| 13,000 | 27.129 | 13.325 | −13.804 |
| 13,250 | 26.678 | 13.184 | −13.494 |
| 13,500 | 25.219 | 12.947 | −12.272 |
| 13,750 | 12.795 | 12.656 | −0.139 |
| 14,000 | 12.732 | 12.676 | −0.056 |
| 14,250 | 12.972 | 12.902 | −0.070 |
| 14,500 | 13.164 | 13.118 | −0.046 |
Italics: off the pipe.
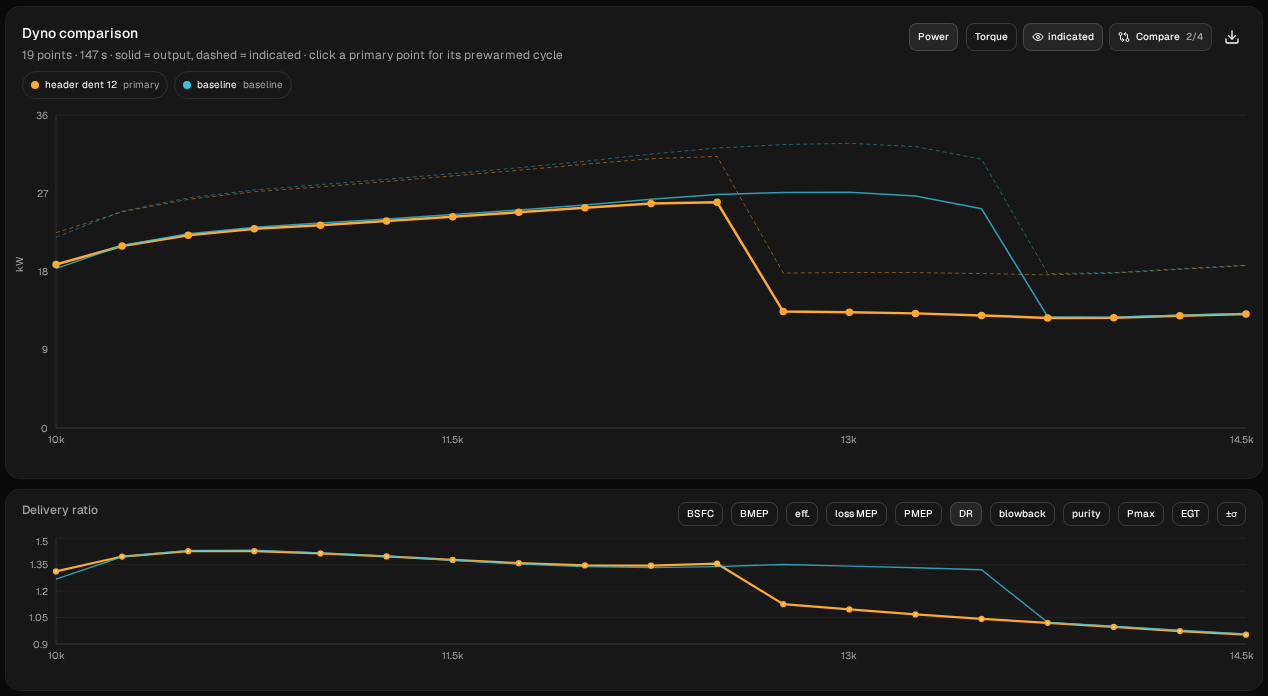
Below the peak, it costs a little and more as the rpm rises. From 10,250 to 12,000 the dent is 0.066 to 0.317 kW behind, about 1 %. At 12,250 it's 0.488 kW, at 12,500 0.891 kW (3.3 %). At 10,000, the first point of each sweep, it's 0.481 kW ahead.
The top is where it costs. The dented pipe is off the pipe by 12,750, where the baseline holds on to 13,500. From 12,750 to 13,500 it makes about half the baseline's power: 12.272 to 13.804 kW less. It drops off between 12,500 and 12,750, 1,000 rpm sooner than the baseline, which drops between 13,500 and 13,750. Its highest sampled point is 25.954 kW (34.8 hp) at 12,500, 1.175 kW (1.6 hp) below the baseline's, and 500 rpm lower. From 13,750 up both are off the pipe, within 0.139 kW of each other.
Switch the lower chart to DR. While both are on the pipe, from 10,250 to 12,500, the dent's delivery ratio is within 0.016 of the baseline's. Where it drops off, the delivery ratio and the trapped charge drop with it: at 13,000, 1.096 against 1.341, and 70.08 mg trapped in the cylinder against 125.28 (trapped_mass_mg in the CSV export). That's what falling off the pipe looks like in the numbers: the cylinder holds about half the charge. Tutorial 5, section 6 shows it from inside the pipe.
In wave terms, the dent is a short closing cone and then a short opening one, 155 mm from the port, before the diffuser has even started. Tutorial 5 shows what a closing cone (the baffle) and an opening one (the diffuser) send back towards the port, and how the band ends when the waves get back too late. This page doesn't trace the dent's waves; it reads what they do to the power. The wave diagram would let you look.
Each sweep climbs from 10,000, and each point starts from the state the one before it left. Tutorial 10, section 3 shows that where a sweep drops off the pipe can depend on that: started cold at 13,000, this baseline is already off the pipe. Every sweep on this page climbs the same way from the same rpm, so they compare like with like.
4. Half as deep
Restore baseline (Compare → its restore icon → Restore settings) and check that Diff inputs against it is empty and the cone table is back to five rows. Restoring also puts Run → Setup → Quality back to Standard; this run and the rest of the page stay there. Then repeat step 2 with one change: cone 1's ⌀out is 41.1 instead of 37.7. That's a dent 6 mm deep, 8.5 % of the area. Diff inputs against header dent 12 lists eight lines: cone 1's ⌀out and cone 2's ⌀in, and the six quality lines going back from High to Standard. Run it and name it header dent 6.
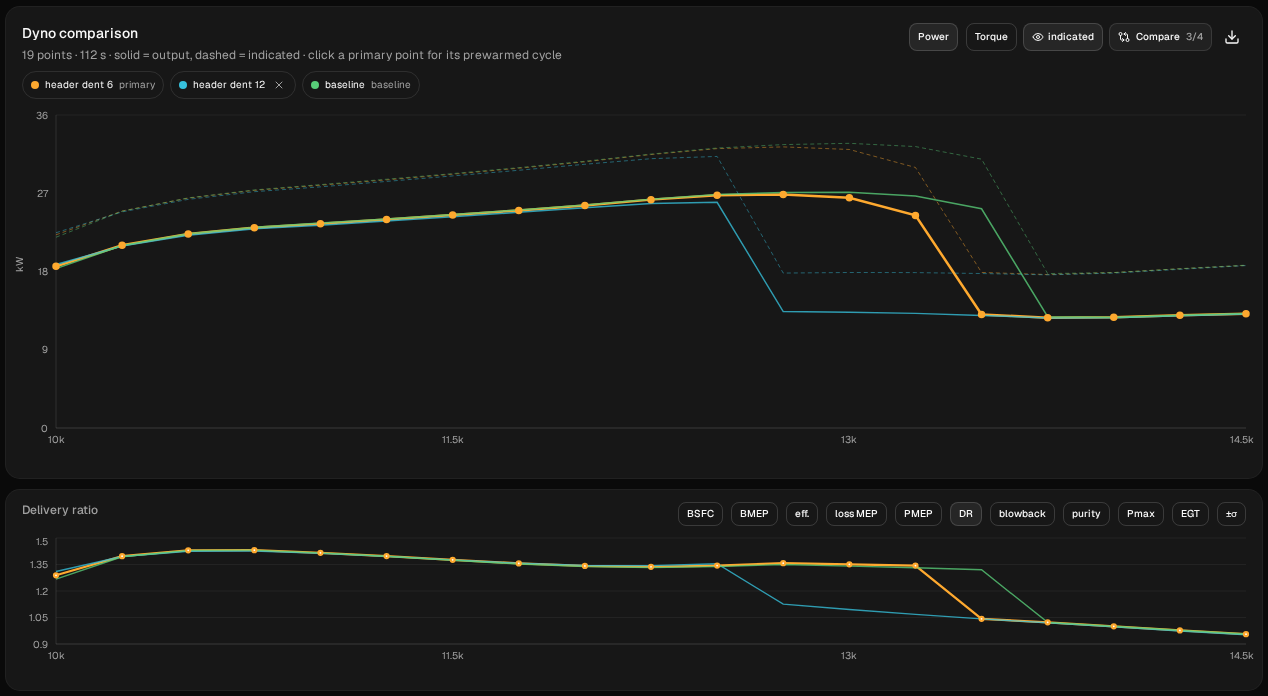
| rpm | baseline kW | header dent 6 change | header dent 12 change |
|---|---|---|---|
| 10,000 | 18.331 | +0.260 | +0.481 |
| 11,000 | 23.565 | −0.062 | −0.232 |
| 12,000 | 25.658 | −0.056 | −0.317 |
| 12,500 | 26.845 | −0.065 | −0.891 |
| 12,750 | 27.086 | −0.243 | −13.700 |
| 13,000 | 27.129 | −0.654 | −13.804 |
| 13,250 | 26.678 | −2.225 | −13.494 |
| 13,500 | 25.219 | −12.157 | −12.272 |
Italics: that run is off the pipe and the baseline isn't.
Half the depth is far less than half the cost. From 10,500 to 12,500 the 6 mm dent is within 0.069 kW of the baseline, under a third of what the 12 mm dent costs at each of those points. It starts to show at 12,750, sags at 13,000 (−0.654 kW) and 13,250 (−2.225 kW), and drops off the pipe one step sooner, between 13,250 and 13,500. Its highest sampled point is 26.843 kW (36.0 hp) at 12,750, 0.286 kW below the baseline's. Here, the deeper half of the dent cost far more than the first half.
5. The same dent further down the pipe
Restore baseline again. This time click the + on the second row, the diffuser (the first cone): three 150 mm straights at ⌀100 go in after it. Type the lengths: cone 1 (the old diffuser) 15, cone 2 15, cone 3 15, cone 4 165. Then the ⌀out values: cone 1 48.9, cone 2 48.1, cone 3 56.8, cone 4 100.0. That's the same 12 mm dent 30 mm into the cone, 295 mm (11.6 in) from the flange, where the cone is 52.9 mm across: 17.1 % of the area. The badges read 843 mm and tuned ≈ 12900; Diff inputs lists 20 lines, all under Exhaust / Sections. Run it and name it cone dent 12.
In the first cone, it cost less than in the header. From 10,500 to 12,750 it's within 0.308 kW of the baseline. It sags at 13,000 (−0.489 kW) and 13,250 (−1.063 kW) and drops off the pipe one step sooner, between 13,250 and 13,500, like the 6 mm dent in the header. Its highest sampled point is 26.778 kW (35.9 hp) at 12,750, 0.351 kW below the baseline's.
Restore baseline once more and click the + on the third row, the belly: three 150 mm straights at ⌀100 go in after it. Type the lengths: cone 2 (the old belly) 35, cone 3 15, cone 4 15, cone 5 35. Then cone 3's ⌀out: 96.5. The other new rows are already 100.0. That's the same 12 mm dent in the middle of the belly, 525 mm from the flange; in a 100 mm tube it takes 6.8 % of the area. The badges read 843 mm and tuned ≈ 12900 again; Diff inputs lists 15 lines, all under Exhaust / Sections. Run it and name it belly dent 12.
In the belly, the dent cost nothing. It's never more than 0.004 kW below the baseline anywhere in the sweep. Near the top it's slightly ahead: 0.110 kW at 13,000, 0.157 at 13,250 and 0.566 at 13,500. The drop stays between 13,500 and 13,750. Its highest sampled point, 27.239 kW (36.5 hp) at 13,000, is 0.110 kW above the baseline's, which on a top this flat means little.
| The same 12 mm dent | Header | First cone | Belly |
|---|---|---|---|
| From the flange | 6.1 in | 11.6 in | 20.7 in |
| Area lost | 22.9 % | 17.1 % | 6.8 % |
| Highest sampled point | 25.954 kW (34.8 hp) at 12,500 | 26.778 kW (35.9 hp) at 12,750 | 27.239 kW (36.5 hp) at 13,000 |
| Last point on the pipe | 12,500 | 13,250 | 13,500, as the baseline |
At the sampled peak and in over-rev, the same dent cost less the further down the pipe it was. But the pipe widens as it goes, so the same 12 mm takes a smaller share of it, and the model sees area. These runs don't separate the two: they show where a 12 mm dent costs on this pipe, not whether the place or the share of area matters more.
6. Set beside two dyno tests
Two published dyno tests turn up when you search for this.
The first is On The Pipe Racing's dent test, reposted on kdxrider.net in 2011: a KTM 125 with a new Pro Circuit pipe, dented with hammers. A small dent in the head pipe, about 6 in from the flange (1 in across, ½ in deep), was “a disaster”: half a horsepower down at 6,000 and at 11,000 rpm, and a full horsepower down at peak. Dents in the first cone, about 10 in from the flange, gave a fifth of a horsepower more at peak but lost over-rev. A sledgehammer dent in the centre cone, added with the head-pipe and first-cone dents still in the pipe, made no difference: no further change to a pipe that was already dented.
The second is Australasian Dirt Bike's Sherco 300 (2024): dynoed with a dented pipe and again after the repair, it made 0.6 hp less at peak revs with the dent, and the biggest difference was between 5,000 and 7,000 rpm. The article doesn't say where the dent was.
This model points the same way as the first test in the header: a header dent 6 in from the flange costs at the top and below it. In the belly the model's dent cost nothing against an undented pipe; their centre-cone dent made no further difference to a pipe already dented in the head pipe and first cone. That's not the same test, but it points the same way. In the first cone the model lost over-rev too, one step of it, as their first-cone dents did, but it didn't gain at the peak: it lost 0.351 kW there. That's a comparison, not a confirmation. It's a different engine and a different pipe, their dents were local dimples where these are flats right across the tube, and the model doesn't know the dent's shape or lose energy behind it.
What to take from it
On this model, with this engine and this pipe:
- A 12 mm dent 6 in down the header hardly moved the power below the peak (within 0.317 kW from 10,250 to 12,000), but brought the drop off the pipe sooner, to between 12,500 and 12,750 from between 13,500 and 13,750, and the peak down by 1.175 kW (1.6 hp).
- Half as deep, it cost under a third as much below the peak (within 0.069 kW from 10,500 to 12,500) and moved the drop one step. The cost grew much faster than the depth.
- The same 12 mm cost less the further it was from the port: the last point on the pipe moved 1,000 rpm in the header, 250 rpm in the first cone, and not at all in the belly. The further down, the wider the pipe and the smaller the share of area 12 mm takes; these runs don't separate the two.
- The pipe's length and the tuned ≈ badge don't change. A dent is invisible to anything that only reads lengths.
That's one engine, not a rule. To try it on yours:
- Enter your own engine and pipe with the setup wizard (tutorial 1) and sweep it as it is.
- Measure the dent's depth and where its centre is, and the pipe's diameter there. Work out the area it takes (a flat h deep across a tube of diameter D cuts off a circular segment) and the round diameter with the area that's left. Then split the row with +, as in step 2: the row's ⌀ at the start and end of the dent, and the round equivalent at its centre.
- Sweep past the drop, not only to the peak: here the peak fell 1.175 kW and the last point on the pipe moved 1,000 rpm. Check a move of one step with a finer sweep.
- Change one thing at a time and check it with Diff inputs, as in tutorial 2.
The mesh. The app splits this pipe into 99 cells of about 8 mm and reads the area at each cell boundary, so a 30 mm dent gets only a few readings. For the 12 mm header dent, the narrowest boundary falls 152 mm from the flange, at 38.6 mm: about 19 % less area there, not the 22.9 % at the dent's centre. The model saw a slightly milder dent than the one typed. This page keeps the default mesh. The cell size is Cell size Δx, under Model calibration (advanced) below the cone table; its own note says not to take it below about 4 mm with the stinger's throat orifice on.
These are simulated estimates from a 1D gas-dynamics model of a generic engine, not measurements, and not your engine. The model isn't calibrated against a dyno, and even the differences between the runs hold only for this model. It sees a dent's area and not its shape, and it has no loss for the gas breaking away behind the dent, so the cost it shows is a floor. It says nothing about whether a real pipe should be repaired or replaced, or how a bike will ride. See the Terms of Service, section 4.
Next: tutorial 5 shows what each part of the pipe sends back to the port, and tutorial 2 changes the header's length instead of its area.